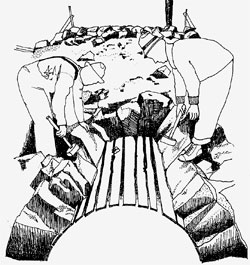
 Masons build a culvert. Image provided by Maryhill Museum, Goldendale, Washington.
(Library of Congress, Prints & Photographs Division, HAER ORE, 26-TROUT.V1- (sheet 12 of 27))
Note:
Masons build a culvert. Image provided by Maryhill Museum, Goldendale, Washington.
(Library of Congress, Prints & Photographs Division, HAER ORE, 26-TROUT.V1- (sheet 12 of 27))
Note: Most
information on this page is based on 1995 interviews with Richard Fix, master mason.
Italian Craftsmen
Visitors to the Historic Columbia River Highway marvel at the masonry along the road. Many of the arched guard walls, retaining walls, water stops and culverts were built by Italian craftsmen hired by Sam Lancaster to create functional and artful features along the highway.
Dressing
 Dressing rock.
(Library of Congress, Prints & Photographs Division, HAER ORE, 26-TROUT.V1- (sheet 12 of 27))
Dressing rock.
(Library of Congress, Prints & Photographs Division, HAER ORE, 26-TROUT.V1- (sheet 12 of 27))
Rock used for masonry was brought in from as far away as a mile, but most of it was taken from the immediate vicinity of the work site. Moving larger rocks required a special technique that included the use of hand star drills. These tools, which work something like a jackhammer without the pneumatic assistance, made holes into which workers inserted pins. They then strung cables through the pins to move the rock to a work area where it could be broken into smaller pieces using feathers and wedges. Feathers were put into holes drilled along a desired break line about 4-6 inches apart. The masons would then gently tap each wedge into a feather along the break line. Tapping too hard could result in an undesired break. This painstaking sequence would then be repeated until the rock was split. Masons shaped smaller rocks using stone hammers and bushing hammers. This dressing process worked best when the rock was "green," within a month of being cut.
Patterns
Random rubble, as shown in step 3 below, uses irregularly shaped rocks laid without a discernible pattern. Each mason developed his own individual style. This style was manifested in everything from the preferred size of rocks to the amount of time spent dressing the stones or tooling the joints.
Ashlar patterns, as shown in the retaining wall illustration below, display attention to uniformity of height in rock courses. Masons built many walls along the highway with ashlar facing on the front and random rubble on the back.
Arches
 Mortar joints.
(Library of Congress, Prints & Photographs Division, HAER ORE, 26-TROUT.V1- (sheet 12 of 27))
Mortar joints.
(Library of Congress, Prints & Photographs Division, HAER ORE, 26-TROUT.V1- (sheet 12 of 27))
Visitors enjoy the picturesque appearance of masonry wall arches, but the arches also serve the more practical purpose of improving drainage. Both the wall itself and the road surface could be undermined by water pooling behind a solid wall. The arches provide a path for the water to leave the road.
Some of the arches built into masonry walls were semi-circular but most were semi-elliptical ( a sort of elongated semi-circle) for several very practical reasons. Semi-elliptical arches could span greater distances under the same 30-inch rail height than semi-circular arches. This resulted in the use of less rock for a given length of wall. The semi-elliptical arches also used significantly less labor. Semi-circular arches required masons to dress the arch stones in a roughly identical shape to fit the curved pattern. Semi-elliptical arches, on the other hand, were flatter so that once the bottom of the arch was formed, the rest of the stones could be more easily dressed because of their straight lines.
Mortar Joints
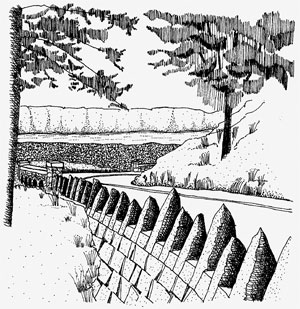 This image of a retaining wall with guard rocks shows ashlar patterns. Image
provided by
Oregon Historical Society
(Library of Congress, Prints & Photographs Division, HAER ORE, 26-TROUT.V1- (sheet 12 of 27))
This image of a retaining wall with guard rocks shows ashlar patterns. Image
provided by
Oregon Historical Society
(Library of Congress, Prints & Photographs Division, HAER ORE, 26-TROUT.V1- (sheet 12 of 27))
Once a masonry wall was built, a mason would rake the concrete grout joints so that they were recessed about 1 to 1.5 inches from the face of the rock. He then filled the resulting channel with a finish mortar consisting mostly of fine sand applied with a small grout bag. Any excess mortar was then “feathered to the stone” or evenly spread to hide irregularities and make the joints appear uniform in width. Masons often used a bead joiner to tool the joint to curve inward gracefully.
For the best results, this finishing mortar was applied while the coarser wall grout was still wet in order to form a good bond. However, in practice on the Historic Columbia River Highway, the crew that finished the mortar joints often arrived days after the grout had set, resulting in “cold joints” that were prone to flaking off over time.
Retaining Walls and Guard Rocks
In addition to the grout and mortar masonry walls, several miles of retaining walls were constructed along the highway. In contrast to the mortar sealed walls, these walls were “dry laid” without mortar to allow water to drain away from the bed of the road instead of undermining it. To keep the walls sloped consistently, masons used batter boards (temporary wooden frameworks) as well as jack lines (string guide lines). Many of the retaining walls were capped with guard rocks that continued the slope of the wall and kept traffic on the roadway. Masons shaped the semi-circular inside faces of these guard rocks with bush-hammers.
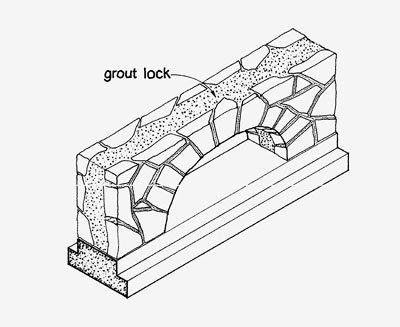
Process: Building a Slip-Form Grout-Lock Wall
(Images and text:
Library of Congress, Prints & Photographs Division, HAER ORE, 26-TROUT.
V1- (sheet 12 of 27))
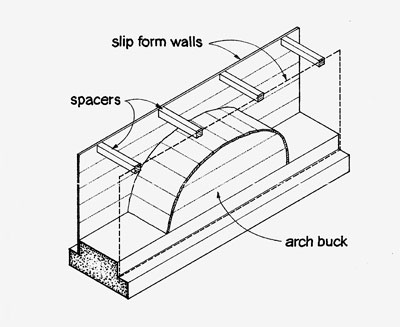
1. Set up the form
This is done on top of a stable surface, like a retaining wall or concrete foundation.
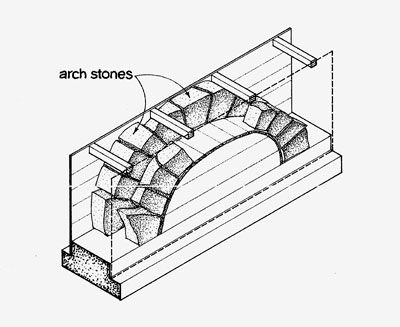
2. Lay the rock
Arch stones are grouted in first and then the remaining stones are laid and grouted until "laid up to height."
3. Strip the forms & finish the joints
See the Mortar Joints description above.
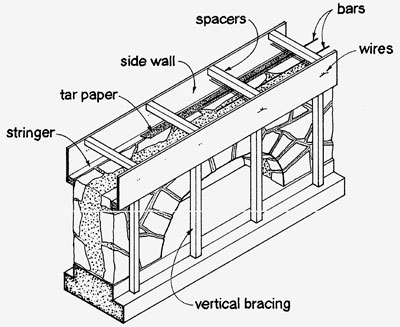
4.
Build the cap form
Set up vertical bracing, stringers, side walls. Tie wires, lay bars and insert spacers. Line the bottom joints with tar paper.
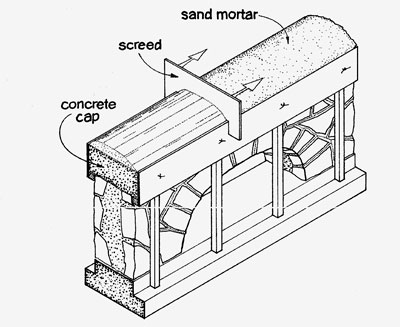
5. Pour & finish the cap
Pour the concrete and screed flush. Apply sand mortar and screed to shape. Cut wires and remove forms when set.
Masonry Examples
These images are just a few examples of the lasting work of masons along the Historic Columbia River Highway.
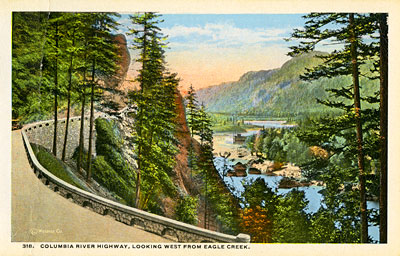
A vintage postcard shows a masonry wall on the highway at Eagle Creek. (Oregon State Archives, Private Donation Postcards)
Credit
Most of the information on this page was adapted from the Historic American Engineering Record, National Park Service, Elaine G. Pierce, 1995. (Library of Congress, Prints & Photographs Division, HAER ORE, 26-TROUT.V1- (sheet
12
of 27))